Operating the Golden Cocks is very simple but please note that for success in hatching operation you must first read the Manual Carefully.

● Before putting eggs into the machine, it should work for 1-2 days to make sure that every parts work correctly.
● If you do not have enough experience to use the machine, it is recommended, not to use expensive eggs. Start with some cheap eggs.
● Do not install the machine outdoor and under direct sun light or wind.
● The ideal temperature of the room is between 23-27 degrees, otherwise the output decreases.
● When using air conditioning systems, make sure that the machine is not exposed to the warm or cold wind.
● Enclosed and poorly ventilated spaces are not recommended .It will reduce efficiency.
● There are some inlets under the machine to enter fresh air. Do not put the machine on the carpet or any floor covering those inlets.
● Please note that the ventilation channel on the machine's door must be open all the time.
● During the hatching period (3last days) especially when some chicks have been hatched, do not open the machine's door.
● Do not manipulate the electronic systems.
● Ideal humidity of atmosphere is between 50-55 percent.
3 issues are involved in this process:
1- Egg incubator
2- Eggs
3- Operator
● Do not use old eggs. Maximum time of storage eggs is 7 days. Also eggs must be stored in special condition.
● Do not store eggs in refrigerator. the best temperature is 18 degrees and humidity is 55%. store them in dark places.
● Temperature fluctuation of the environment should not be more than 4 degrees.
● If the temperature fluctuation is more than 4 degrees, output decreases.
● Before putting eggs in the machine, put them in a warm place for some hours (about 25 degrees) to prevent any shock.
● To put the eggs in the machine, make sure that the eggs stand on their head.
● Do not wash the eggs; clean them with a dry brush.
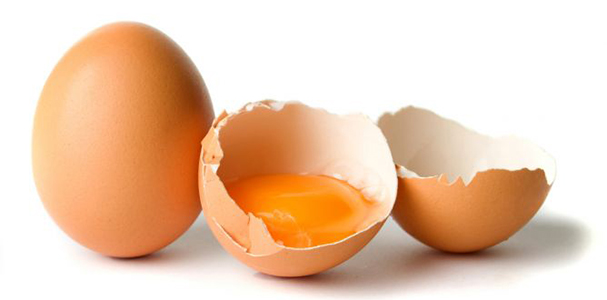
● Do not use very big or small or abnormally shaped eggs.
● Do the egg candling on the 7th and 14th nights and remove transparent eggs from the machine because they are without embryos and can cause the rest of the eggs be contaminated.
● It is suggested that after each period, break the unsuccessful eggs and check out the reason. Note that if after 21 days, eggs still have albumen and yolk it means that they do not have sperm at all.
● The Golden Cocks can work with car battery so during the power cut connect the machine to the battery because fan failure and temperature reduction has devastating effects on chicks.
● Do not use any chemical for cleaning the machine.

Incubation process is divided to 2 periods of setter and hatch.
• During setter period, the egg is on the tray and turns. In this period the chick grows inside the eggs. Ideal temperature is 37.7 and ideal humidity is 55-65%.
• In hatch period, chick inside the egg is completed .in this period eggs must be put on the hatch basket. Hatch period for chicken eggs is 3 days.

For the diagnosis of fertilized eggs and also to ensure the growth of the embryo, do the egg candling on the 7th and 14th nights.
1-Do the egg candling in a dark room.
2- Do the egg candling in a warm room to prevent any shock.
3- Make sure that during egg candling the egg is not exposed to intense shaking.
4- Do the egg candling in the shortest time.
5- Remove the transparent eggs from the machine otherwise the rest of the eggs will be contaminated.

While looking through eggs on seventh night, you must see blood vessels and black spots, otherwise remove transparent eggs.
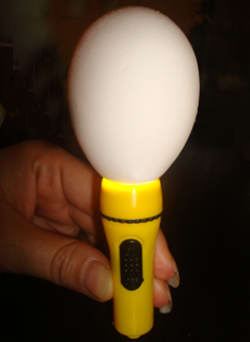
On the 14th night, if you observe eggs, you must see most of the inside dark, otherwise remove transparent eggs again.

1- Body: it is made of ABS with 3 cm thickness insulation layer.
2- Controller: the digital controller with the precision of a tenth of a degree. The ideal temperature inside the machine is 37.5 -37.7 degrees and the ideal humidity inside the machine is 55-65% .
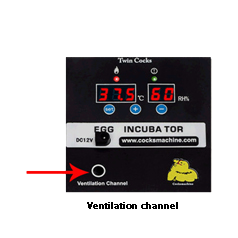
Note: The machine is adjusted in the factory. Do not change the setting.

Note: The machine's fan must work all the time. check the fan daily and make sure that it works properly.
3- Adaptor and battery connectors:
In case of power cut, connect the machine to the battery by using battery cable.

4- Egg Candler: doing egg candling on the 7th and 14th nights.
5- Tray: this machine has 3 kinds of trays for all kind of bird eggs. You can watch the method of changing trays on the video.

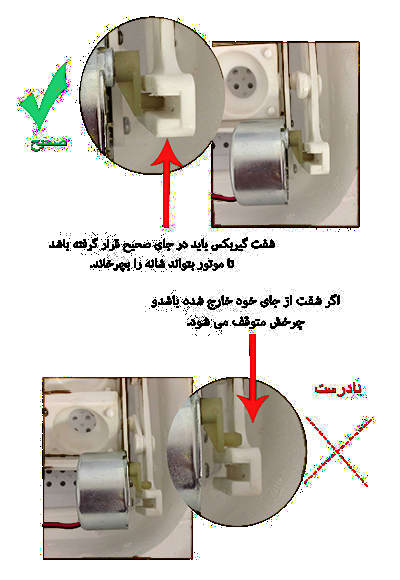
Note: Turning the eggs cannot be seen easily. To make sure that the gearbox works, put your hand on it and you must feel its shake and warmth.
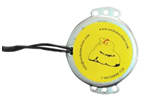
Place of connecting the motor to the digital part is shown in the previous page.
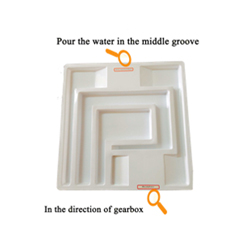
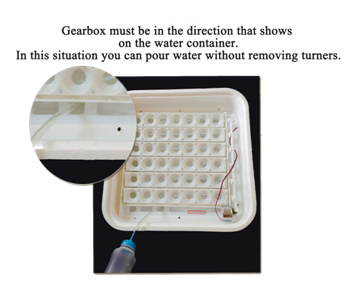
6- Water container: It has different grooves. At first only pour water in the middle groove. If after 2 hours humidity doesn't reach to 60%, add water to another groove.
The machine has a special container to help you to pour water so there is no need to remove the tray to pour water. Pour some water in the machine Every 3 days.
8-Hatching basket: only put this basket in the machine during the last 3 days. if you do not remove the basket during the first days, humidity does not go up.
In hatching period, remove the tray from the machine and put the basket on the water container and put eggs on it.
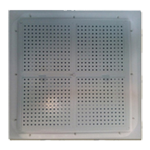

- Put the water container in the machine and pour water in the middle groove.
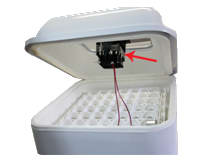
- Put the tray in the machine and connect the gearbox to the digital part.
Note: before putting eggs in the machine, let it works for a day to make sure that every part works properly.
Then put the eggs. Eggs must be stand on their head. Close the machine door and make sure that air cannot enter.
- Turn the machine on.
The machine has alarm so that when temperature or humidity is not adjusted, it goes on. To turn the alarm off, press the (-) button for 3 seconds.
Note: the machine is adjusted in the factory, do not change the setting.
Turn the machine on and note the following:
• The fan works with high speed.
• Signal lamp in the place of connecting gearbox must be on.
• The gearbox is warm and shakes.
During the 18 days of setter, every 3 days pour water in the machine.
The ideal temperature inside the machine is 37.5 -37.7 degrees and the ideal humidity inside the machine is 55-65%.
In the 7th and 14th nights, do the candling with considering all important notes.

- Remove the trays from the machine.
- Pour water in the water container to make sure that there is no need to open machine door during rest of the days.
- Put the hatch basket on the water container.
- Put the eggs on the basket without any shake.
Note: Operation of transferring eggs must be done in a warm room to prevent any shock.
- Close the machine door and do not open it.
It is suggested to open the door on the 2nd and 4th days, then take the chicks out, because with each opening and closing the door some chicks could die.
The humidity will rise while chicks hatching; in this case remove the plastic plug on the glass to remove the extra humidity.
The hatching of all chicks may extend to the 25th day.

| Poultry | Period of incubation |
|---|---|
| chicken | 21 |
| Peacock | 28 |
| Ostrich | 42 |
| Goose | 28-31 |
| Swan | 30 |
| Pigeon | 16-18 |
| Pheasant | 20-24 |
| Quail | 17-18 |
| Partridge | 23-25 |
تشغيل الجهاز Golden Cocks او جهاز التوأم هو بسيط جدا ولكن يرجى ملاحظة أن للنجاح في عملية الفقس يجب أولا قراءة الدليل بعناية.


تنقسم عملية الحضانة إلى 2 فترات الضبط والفقس.
• أثناء فترة الضبط، تكون البیض على درج الصینیة حیث تدور و تتحول. في هذه الفترة ینمو الفرخ داخل البيض. درجة الحرارة هي 37.7 والرطوبة المثالية هي 55-65٪.
• في فترة الفقس، يتم الانتهاء الفقس بالنسبة للفرخ داخل البيض .في هذه الفترة يجب وضع البيض على سلة الفقس. فترة الفقس بالنسبة لبيض الدجاج هي 3 أيام.

لتشخيص البيض المخصب وأيضا لضمان نمو الجنين، قم بفحص التشخیص للبيض على لیال 7 و 14.
1- قم بفحص البيض في غرفة مظلمة.
2- قم بفحص البيض في غرفة دافئة لمنع أي صدمة.
3- تأكد من أنه خلال فحص البيض، انها لا تتعرض لهزة شدیدة.
4- قم بفحص البیض في أقصر وقت.
5- قم بإزالة البيض الشفافة من الجهاز وإلا سيتم تلوث بقية البيض.

أثناء النظر من خلال البيض في الليلة السابعة، يجب أن ترى الأوعية الدموية والبقع السوداء، وإلا فقم بإزالة البيض الشفافة.

في ليلة ال 14، إذا لاحظت البيض، يجب أن ترى معظم قسم الداخل للبیض مظلما، والا فقم بإزالة البيض الشفافة مرة أخرى.

1- الجسم: وهي مصنوعة من ABSمع 3 سم سماكة في طبقة العزل.
2- المراقب: وحدة تحكم رقمية مع دقة المعشار من درجة.
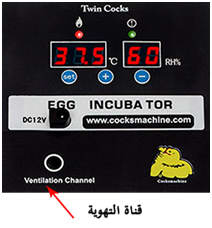
ملاحظة: مروحة الجهاز يجب أن تعمل في كل وقت. تحقق من المروحة يوميا وتأكد من أنها تعمل بشكل صحيح.
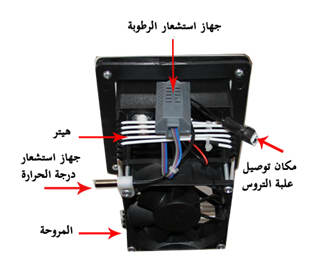
3- محول وموصلات البطاریة
4- فحص تشخیص البيض: قيام بفحص البيض على الليالي السابع والرابع عشر.
5- صينية: هذا الجهاز لديه 3 أنواع من الصواني لكل نوع من الطيور.
يمكنك مشاهدة طريقة تغيير الصواني على الفيديو.
ملاحظة: تحول البيض و دورانها لا يمكن أن ينظر إليه بسهولة. للتأكد من أن علبة التروس يعمل، وضع ضع يدك على الجهاز فيجب أن تشعر بالهزة و الدفء.
قد تم عرض مكان توصيل المحرك إلى الجزء الرقمي في الصفحة السابقة.
6- حاوية المياه: لدی الجهاز الأخاديد المختلفة. في البداية صب الماء فقط في الأخدود الوسطی. فلو أن الرطوبة لا تصل إلى 60٪ بعد 2 ساعة ، فقم بإضافة الماء إلى الأخدود الاخری.
الجهاز يحتوي على حاوية خاصة لمساعدتك على صب الماء لذلك ليس هناك حاجة لإزالة الصينية لصب الماء. صب بعض الماء في الجهاز كل 3 أيام.
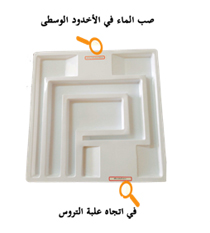
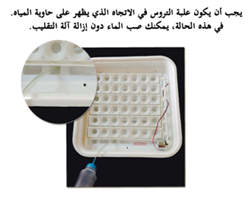
7- سلة الفقس: قم بوضع هذه السلة فقط خلال ال 3 أيام الاخیرة. إذا لم تقم بإزالة السلة خلال الأيام الأولى، الرطوبة لا ترتفع.
في فترة الفقس، قم بإخراج الطبق من الماكينة ووضع السلة على حاوية الماء ووضع البيض عليها.


» قم بوضع حاوية المياه في الجهاز وصب الماء في الأخدود الوسطی.
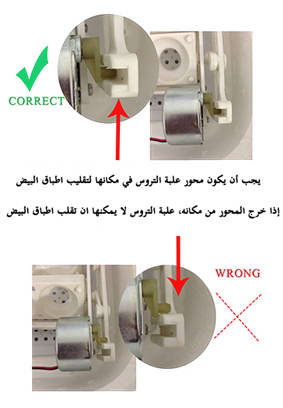
» قم بوضع علبة (الصینیة) في الجهاز وتوصيل علبة التروس إلى الجزء الرقمي.

ملاحظة: قبل وضع البيض في الجهاز، دعه يعمل لمدة يوم للتأكد من أن كل جزء يعمل بشكل صحيح.
ثم قم بوضع البيض. يجب أن یكون وقوف البيض على رأسها. أغلق باب الآلة وتأكد من عدم دخول الهواء.
قم بتشغيل الجهاز.
الجهاز لديه إنذار بحيث عندما لا يتم ضبط درجة الحرارة أو الرطوبة علی العیار المعلم، فإنه يمضي.
لإيقاف التنبيه، اضغط على الزر (-) لمدة 3 ثوان.
ملاحظة: يتم تعديل الجهاز وتعییره في المصنع، فلا تقم بتغيير الإعداد.
قم بتشغيل الجهاز ولاحظ ما يلي:
• أن تعمل المروحة بسرعة عالية.
• يجب أن يكون مصباح اإلشارة في مكان توصيل علبة التروس مضویاً.
• علبة التروس دافئة بها هزة.
خلال 18 يوما من الإعداد، صب الماء في الجهاز کل 3 أیام.
درجة الحرارة المثالية داخل الجهاز هي 37.5 -37.7 درجة والرطوبة المثالية داخل الجهاز 55-65٪.
» في الليالي 7 و 14، قم بفحص التشخیص ومعاینة الجهاز مع النظر في جميع الملاحظات الهامة.

- قم بإزالة الأدراج من الجهاز.
- صب الماء في حاوية المياه للتأكد من عدم وجود حاجة لفتح باب الجهاز خلال بقية الأيام.
- وضع سلة الفقس على حاوية المياه.
- وضع البيض على سلة دون أي هزة.
- ثم وضع سلة فتحة من الطابق الثاني.
ملاحظة: عملية نقل البيض يجب تتم في غرفة دافئة لمنع أي صدمة.
- أغلق باب الماكينة ولا تفتحه. الثاني.
و قد یقترح فتح الباب في اليومين الثاني والرابع، ثم أخرج الكتاكيت، لأنه مع كل فتح وإغلاق الباب بعض الفراخ يمكن أن يموت.
الرطوبة سوف ترتفع بينما الكتاكيت تفقس؛ في هذه الحالة قم بإزالة المكونات البلاستيكية على الزجاج لإزالة الرطوبة الإضافية.
وانه یمکن بأن تفريخ جميع الكتاكيت يمتد إلى اليوم الخامس والعشرين.

| الدواجن | فترة الحضانة والفقس (یوما) |
|---|---|
| دجاج | 21 |
| طاووس | 28 |
| نعامة | 42 |
| إوز | 28-31 |
| تم (إوز عراقي) | 30 |
| حمام | 16-18 |
| تدرج | 20-24 |
